
Request A Quote For Our Scheduling Services
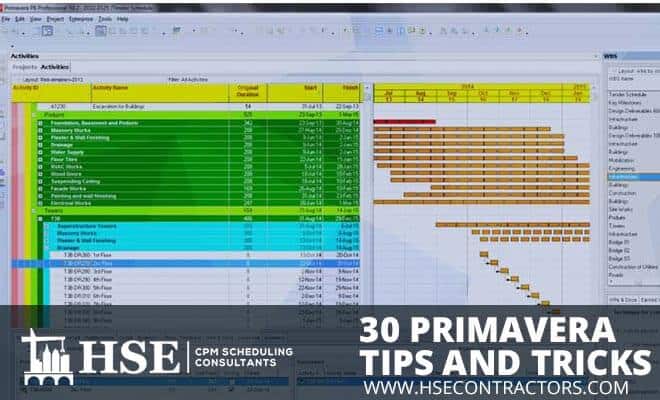
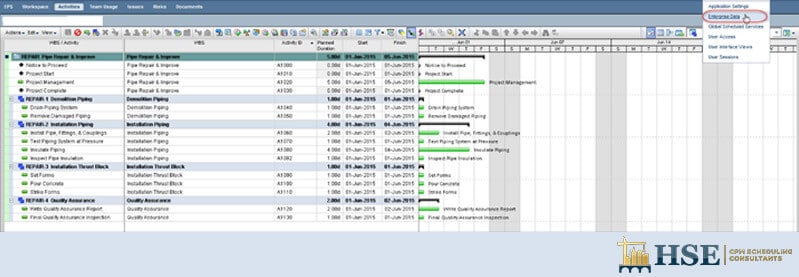
If you are looking to enhance your efficiency and ensure successful project management you are looking for Oracle’s Primavera P6. Ninety percent of the general contractors working on high-value projects with a yearly revenue of 2 to 50 million dollars are using Primavera. Highlighted below you will find the 30 must know tips and tricks to improve your productivity and save time:
#1.Resolve open ends in the schedule activity
A thorough check must be conducted to remove any open ends by locating a good start point for the activities list, without predecessors or successors in the report.
#2.Test Yourself
Familiarize yourself with the term ‘high float, high duration’ and the general parameters. Most users may neglect to configure these when building up a schedule. If you are working on a government-owned project and fail to make these checks before submitting, you will receive a notification review and re-submit. Thus, practicing on some activity names is a vital part of the critical path method, which the commentary here always follows.
#3.Set up your project level
By pre-assigning values such as: duration type, the percentage of completion, type of activity, and cost to the calendar you will eliminate the need of editing them in future.
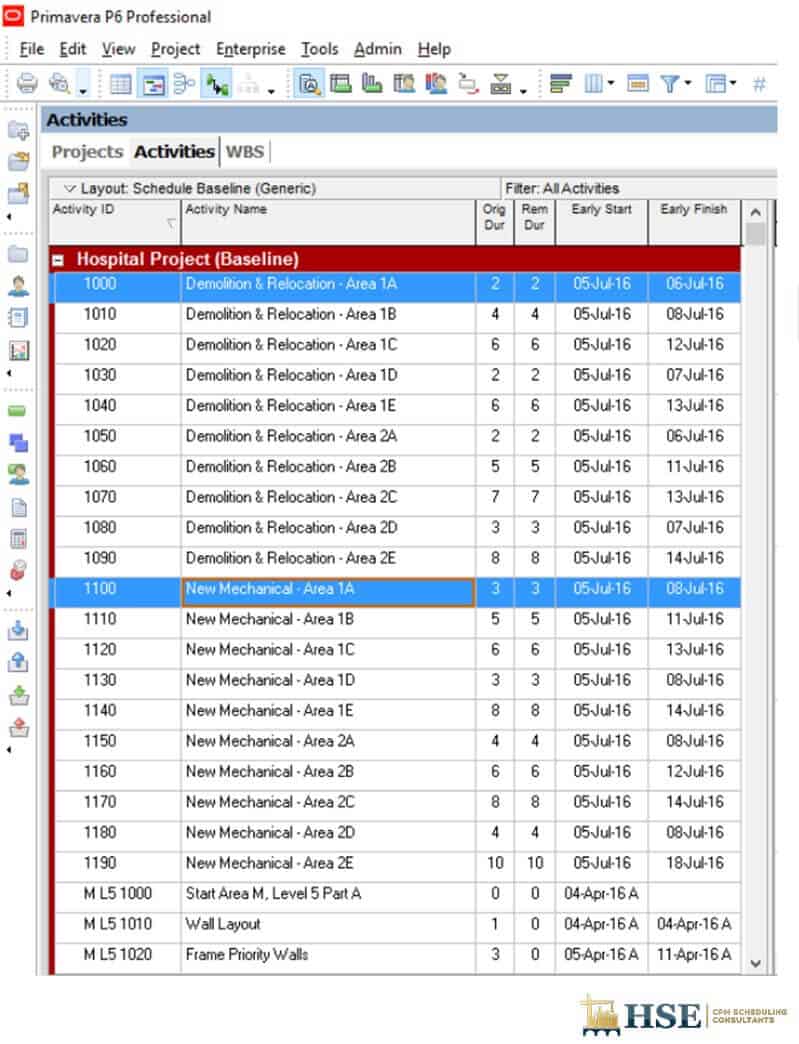
#4.Renumbering the entire schedule
Renumbering the schedule as the amount of activities increase will allow you to easily define values, replace characters and define prefix/suffix of selected activities. You can do this by highlighting all the activities of a certain phase, then right-click, choose to renumber activity IDs and/or check on the auto-number option. Choose your prefix, for example: PH1-. Renumber the IDs Parameters and then update the IDs for the selected activities.
#5.Avoid Auto-Reorganization
Avoid using a layout that groups activities by a certain parameter as every time this information is updated for a single activity, it will move to a different location in the schedule. However, the problem can be solved easily by disabling this setting from the Tools menu or with the hotkeys shift + F12.
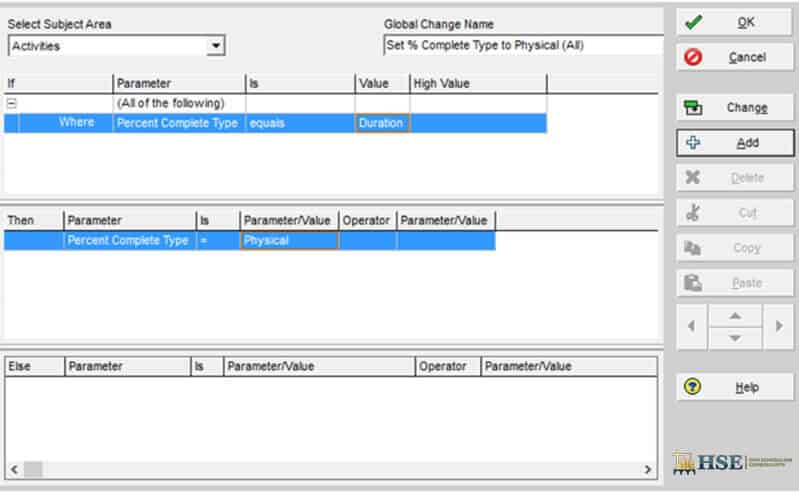
#6.Modify parameter values for all activities in the schedule
AIf, for example, you are trying to change the completion percentage from duration to physical, on certain types of activities, there are several data activity settings that can be edited for all instances of these activities in the schedule. To access this feature, click the on Tools menu, select Global Change and you will be given the option to create or edit preset rules.
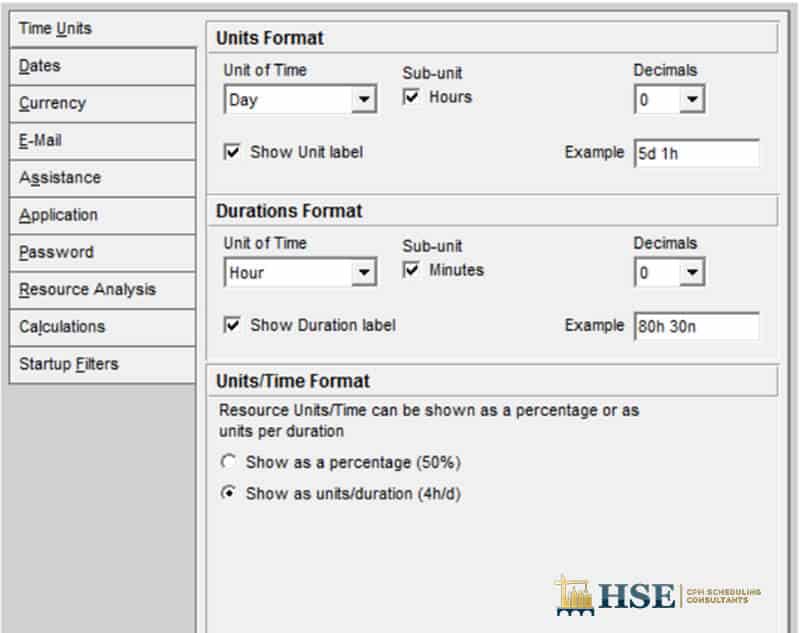
#7.Date & Time Format
For tracking activities on the schedule, you can set the unit of time to days, weeks, months, or years. By navigating between units you will be able to control how the activity information is presented. Click on Edit, then User Preferences and adjust accordingly.
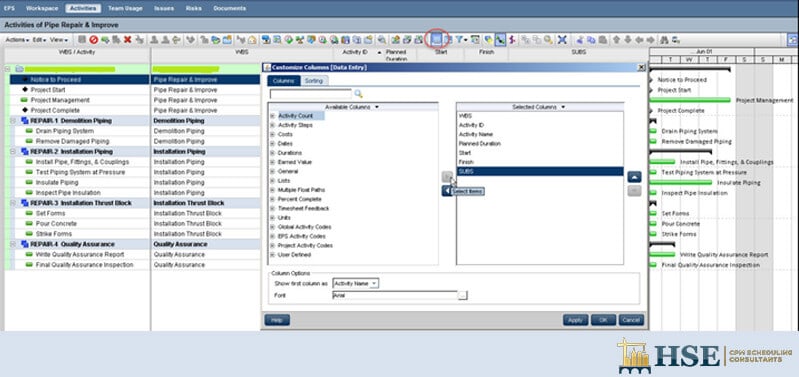
#8.Export to Excel
Primavera P6 allows you to easily export the data directly into a spreadsheet through a simple copy/paste. To perform this action, press CTRL+A to select all, CTRL+C to copy selected information and CTRL+V to paste it directly into a spreadsheet.
#9.Claim Digger
The Claim Digger generates a detailed report of all the changes and differences between two schedules. It includes information such as duration, logic, float, and activity additions or subtractions. To run the Claim Digger utility open the Tools menu, click Claim Digger and select two files to compare.
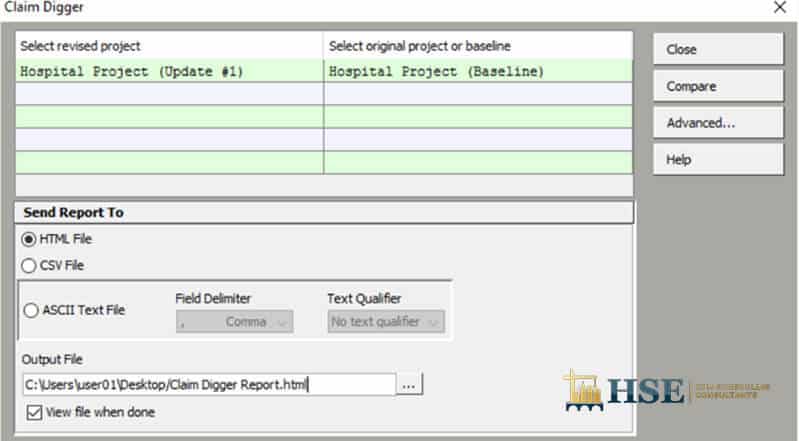
Furthermore, you can have multiple schedules open simultaneously. Primavera P6 allows the user to work on several projects at a time efficiently by creating logical links between them.
#10.Excel Import
To easily import large amounts of data from an excel sheet without having to create each activity one by one use the Import function. Access the Import function from the File menu and select Spreadsheet – (XLS), make sure to choose the correct file.
If you are interested in creating an optimized construction schedule or speaking with one of our construction scheduling engineers
Contact Us
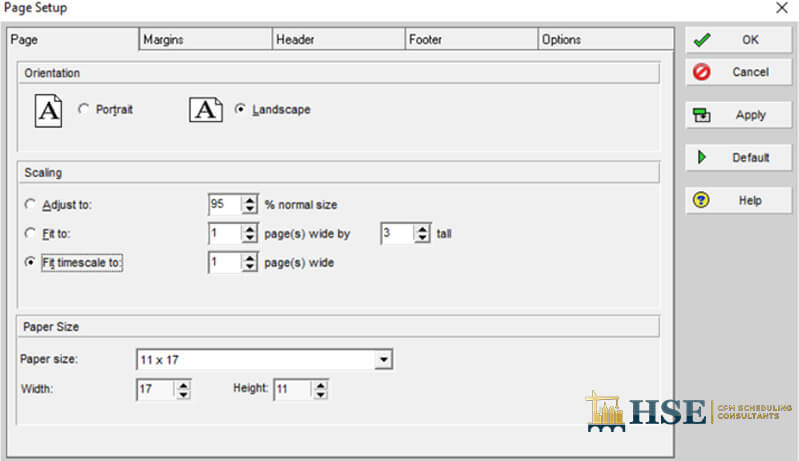
#11.Adjust single-page width
This is a useful tip to avoid the frustration of seeing your schedules printed across multiple pages. When you want to print your schedule simply make sure you have selected “List View” (not EPS) and “Fit Timescale” in the Print Preview and Page Setup menus.
#12.Logic Ties
Creating logic links and ties for a schedule can be done in multiple ways:
- From Activity Details, go to the predecessors and successors tabs and add activity to each list.
- From the Activity Table level, highlight the required activities, right-click on the selection and choose the “Link Activities” option. You can can also do it visually by clicking and dragging your cursor from one bar to another in a Gantt chart.
#13.Longest Path VS Total Float
The intent of the Critical Path Method is to obtain project duration by extracting the longest path of activities from the start till the end of the project.
You may have noticed that P6 offers two criteria for determining the critical path in the schedule. (F9 hotkey>Schedule Options). While each will yield equivalent results beneath bound conditions, most times vital methods will disagree dramatically when calculated beneath one criterion over another. This means that if a 100-activity schedule is delayed and eighty of its activities have negative TF values, then the essential path determined through the primary technique is going to be comprised of eighty-line things, and will not allow us to distinguish the activities that will have an impact on this project’s completion forecast. The Longest Path method, on the other hand, will show exclusively the activities that drive our current completion date and keep the list of “critical” activities to a minimum.
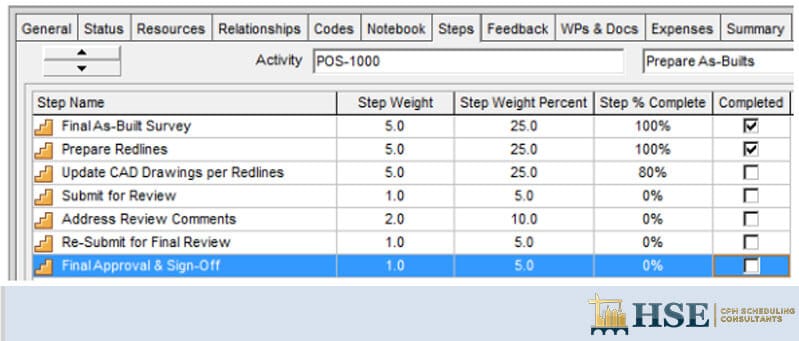
#14.Add Graininess To Your Schedule While not Bumping Up Activity Count
Adding a lot of detail to a schedule allows for smoother progression. In other words, news standing on a deliverable that’s portrayed by multiple activities within the schedule will be a much more structured, traceable and overall reliable than one portrayed by a single-line-item.
For instance, think about the hassle associated with making ready as-built drawings throughout the cut-rate sale part of a project.This will either be incorporated into the schedule as one item representing all work from final as-built survey through to record drawing set approval, or it will be consigned to smaller tasks (or “steps”) and, in effect, silenced. At the same time, however, the latter may result in Associate in Nursing reserve range of recent activities which might make your schedule unmanageable and extremely cumbersome to update. Get the simplest of both worlds by using the Activity Steps feature and resolves issues like this easily. .
This selection permits you to make sub-tasks (namely, “steps”) for the activities you wish to monitor without having to break them down into separate, smaller activities. To do to this, choose the activity you wish to create steps for and open the Steps tab located within the Activity Details window.
#15.Focus on milestones
In terms of a project’s layout, a wise layout alternative is to place all your key milestones along below in a one work breakdown structure to the project. Add a WBS element which is called “Key Milestone” at the project.
Then, drag and drop the project milestones under that WBS element. The foundation of the project organizing system keyword is the Work Breakdown Structure (WBS).
#16.Shade your Non-Work parts in the schedule
Since people love Gantt charts, simplifying them is a necessity. By shading non-work time on the activities, the Gantt chart on P6 clearly shows what days and hours are workable.
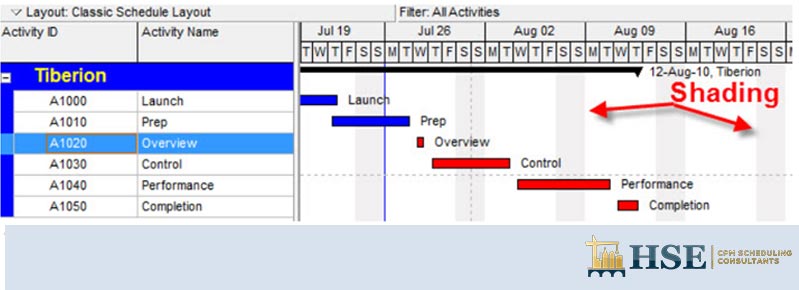
To control how the Gantt chart is shaded, you must ensure that “Global” is selected at the top from “Enterprise” menu, select “Calendars” then check the required worksheet.

What is shaded as non-work depends on the level of zoom you have on your timescale. You can set you timescale as “week/Day1”.
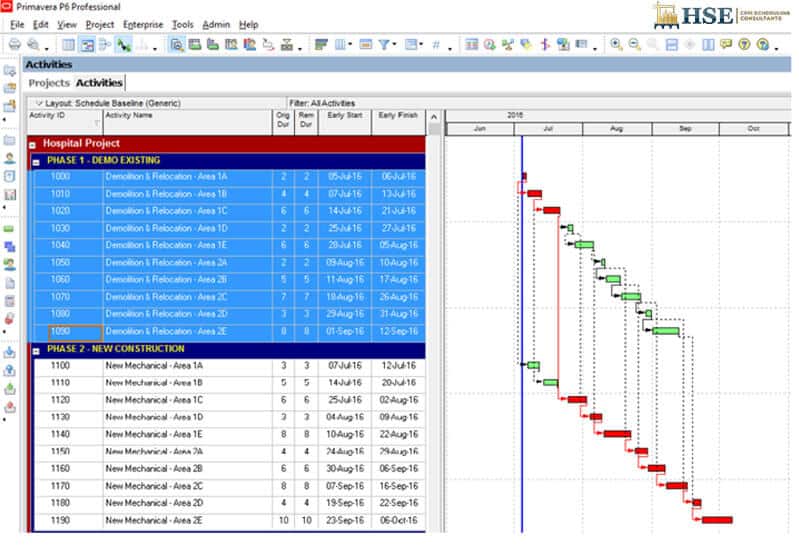
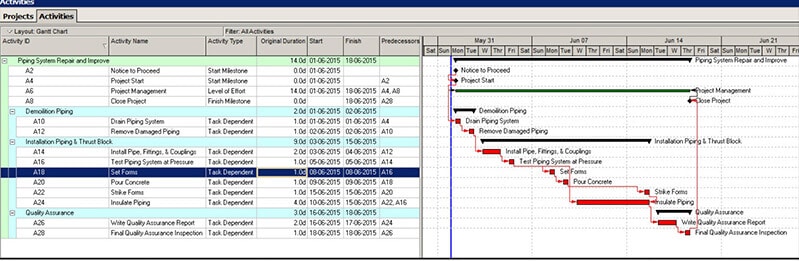
#17.Sequence the Activities
A powerful way to create logic ties is by linking activities at the table level. Forming chains of sequenced activities by highlighting multiple activities as needed. This is done by selecting “Link Activities” from the menu. The below images show the relative steps. You’ll notice that they tail the order from which they were highlighted when generating the links, contrasting to the direction from which they were initially itemized in the activity table.

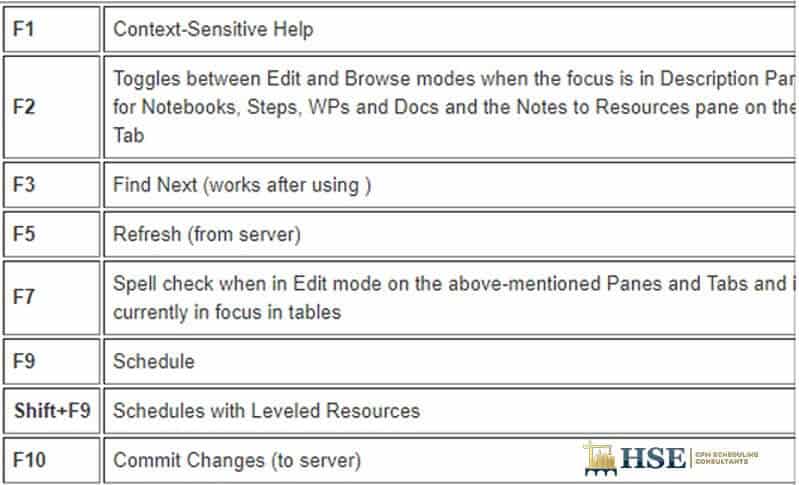
#18.Primavera P3 or P6 function keys
In both the P3, P5 or P6 client and web applications, the following hotkey combinations can be used to save time.
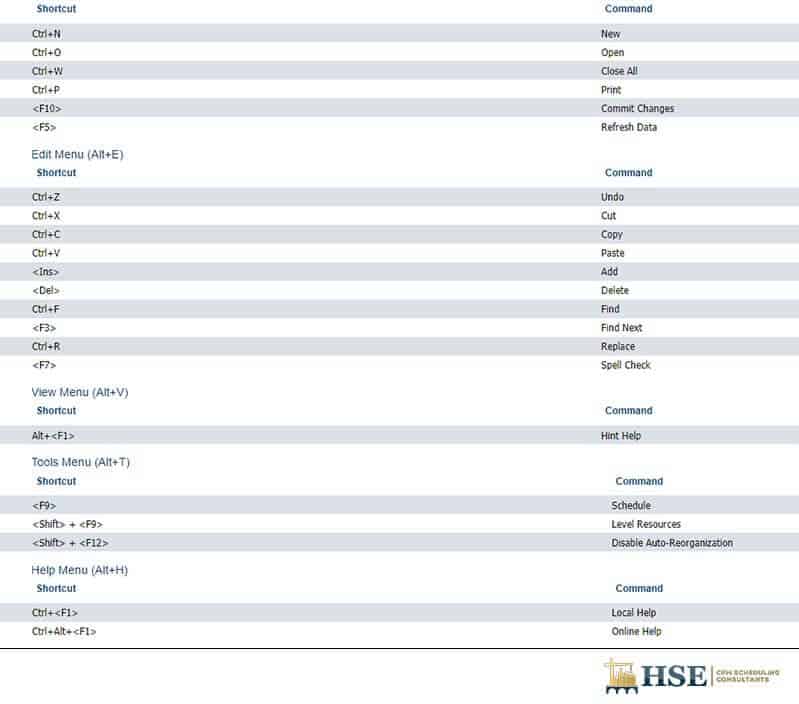
#19.Use Shortcut Keys
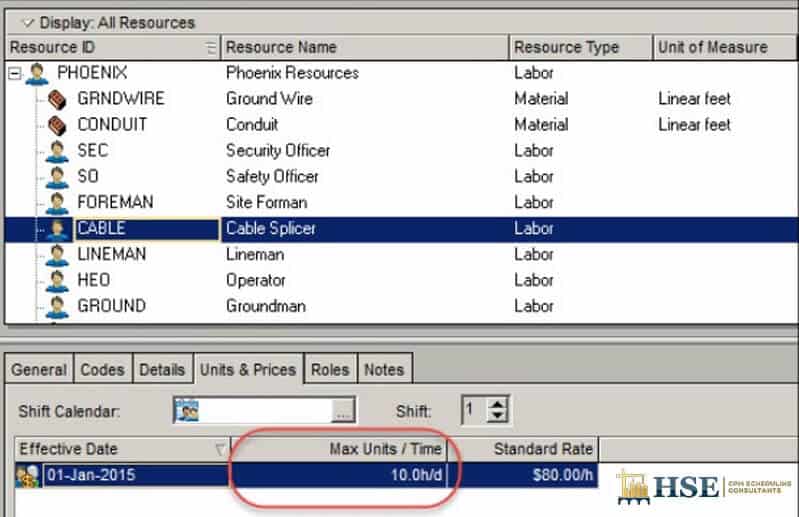
#20.Utilizing the resource codes
Primavera has resources which allow the scheduler to organize, sort and filter the resources glossary. As well as allow grouping and sorting in the resource assignments and profiles.
- Click on Enterprise, choose resources codes from which you can create a code called a Manager.
- Click on modify, add, and then type Manager as the new resource name.
- Click Close.
- At the top, click on Add, as to add names tot the manager resource code.
- Then click close.
- Choose Customize and place the new resource code as the first option. Now the resource dictionary is grouped by the code. To go back to how the resource dictionary was originally grouped use the display option bar, choose group and sort.
#21.Adding Weather To The Schedule
Unless you’re operating inside, weather is a consideration when building a CPM schedule. Typical weather should be addressed for any work that may be hindered by inclement weather. Our primary concern should be, in fact, typical weather, as uncommon weather is associated with a degree of excusable delay. This raises the question of how exactly do we define ‘typical weather’? Contracts usually mention that point extensions can only be granted for abnormal weather while there are no procedures that cover typical weather.
The National Oceanic and Atmospheric Administration has records for thousands of weather stations round the country that in some cases return 100 years or additional.
The U.S. Army Corps of Engineers has what is perhaps the simplest example of a way to define typical weather. The USACE generally tells contractors what number days of inclement weather to incorporate within the monthly CPM scheduling. The government agency would provide the temperature and precipitation data and how it ought to be treated while being receptive to daily interpretation of around 0.1″ of precipitation. The USACE specifications leave little question what number days ought to be blocked out for weather – including weekends and holidays.
- Augment Normal Weather to the Work Calendar
- Create Possibility Activity for the unexpected Weather
- Modify the Normal Weather to the Activity Durations.
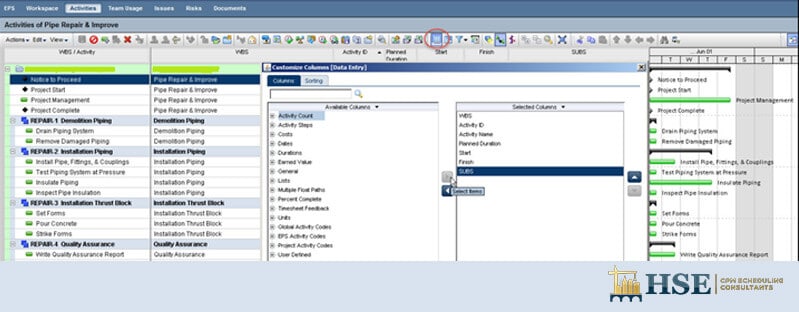
#22.Organize Your Code
While using Primavera P6, there will be times that you will be required to organize especially large schedules with large durations and activities. P6 will allows creating your own code categories and values for better organization.
From Enterprise Data select the Administer dropdown menu and begin assigning codes to subcontractors performing assigned activities. Also, feel free to assign subcontractor categories associated with code values.
Then start on assigning activity codes like the figure below:
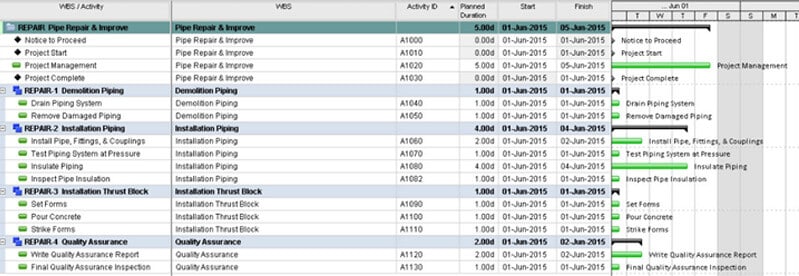
#23.Utilizing the reflections in Primavera P6
Reflections are a great way from which the scheduler can examine the schedules scope changes without permanently affecting the source of the schedule file. Check the figure below. Reflections are a great tool to add the WBS elements, activities, and relationships to visualize the thrust block in the schedule.
#24.Resource over allocation
In situations when your specialized resource is over-allocated, you have various options. You will need to examine the estimated daily effort. As, for example, a part-time effort might only be required. The Project Manager should consider resolving such issues before entering challenging negotiation processes. It is advised to use the ‘as late as possible’, as it will attempt to eliminate over-allocations and will not lengthen your project.
#25.Milestones
Milestone will always signify the start/end of the project phase, whether it is a structural phase, design phase, quality phase, or closeout phase. They will guide the scheduler to the vital activities that will produce the deliverables.
#26.Choose your percent wisely in p6
The percentage types in P6 like duration, physical, or units can be defined at the level of the activity, which is recommended to stay in a swim lane percent complete type for the entire project. This will result in less complexity when more monthly updates are added by schedulers on the team.
#27.Critical path method in Primavera P6
As displayed in the above figure: critical activities to two-days when the threshold for those tasks was raised. This P6 option is helpful for separating the longest leads path for the schedule. However, the activities that start on constraints which are not along the longest path are shown as non-critical and predecessors with constraints are displayed there as non-vital.
So you will need to provide the appropriate value of the adjusted critical activity in the schedule documentation package.
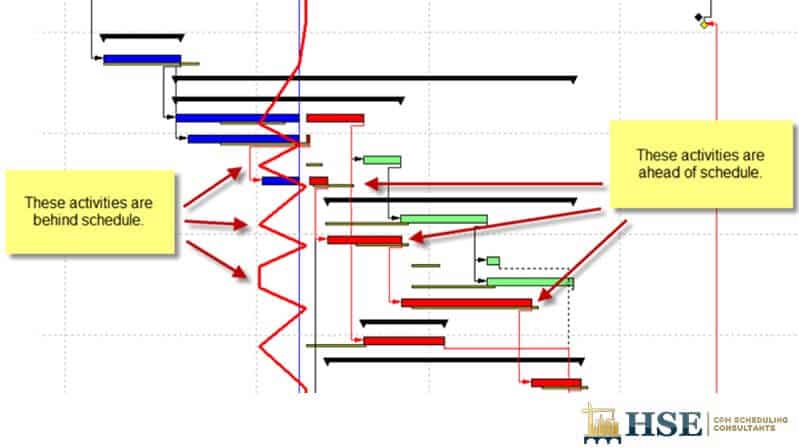
#28.Progress Line
How you can spot faults on a schedule in Primavera P6? Through the progress line which is a vertical plot providing the highest-level view of the total schedule progress.
The progress line is a visual plot in the Gantt chart which will show whether the activity ahead or behind on schedule through data points. As this will enable the scheduler to focus on the main areas that require further attention, as the goal is to keep the progress line straight.
#29.Highlighting and filtering
How can you spot the light on specific activities?
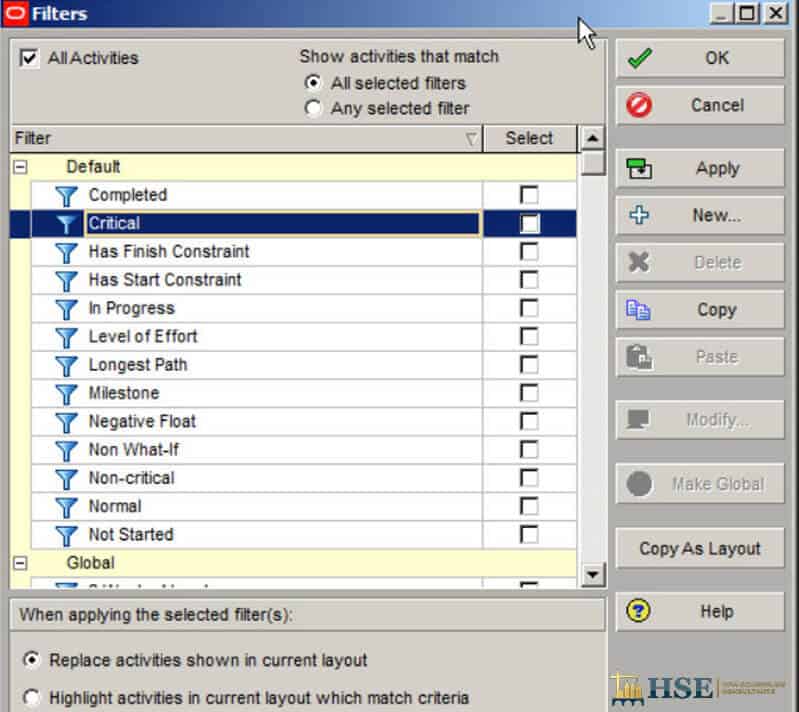
Through using the filtering option, you will be able to highlight all the critical activities within a date range.
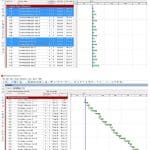
#30.Split Screen
This is a very simple feature which you will need while preparing the schedule and that can have great implications on the project’s success.
If you are interested in creating an optimized construction schedule or speaking with one of our construction scheduling engineers
Contact Us